-
United Kingdom+44 (20) 4577-20-00
-
USA+1 (929) 431-18-18
-
Israel+972 (55) 507-70-81
-
Brazil+55 (61) 3772-18-88
-
Canada+1 (416) 850-13-33
-
Czech Republic+420 (736) 353-668
-
Estonia+372 (53) 683-380
-
Greece+30 (800) 000-02-04
-
Ireland+353 (1) 699-43-88
-
Iceland+354 (53) 952-99
-
Lithuania+370 (700) 660-08
-
Netherlands+31 (970) 1027-77-87
-
Portugal+351 (800) 180-09-04
-
Romania+40 (376) 300-641
-
Sweden+46 (79) 008-11-99
-
Slovakia+421 (2) 333-004-23
-
Switzerland+41 (22) 508-77-76
-
Moldova+373 (699) 33-1-22
 English
How to check a disk for bit sectors in Linux
- Main
- Knowledge base
- How to check a disk for bit sectors in Linux
The most important part of your computer is the hard disk drive. It is where the operating system files and other important information are stored. The unit of storage on the hard disk is a sector or block. It is in it that a certain amount of data is written, usually it is 512 or 1024 bytes. Over time, the disk will have bit sectors that stop working, but the file system continues to try to write information to them. It is extremely difficult to write information to such sectors, so the user may lose them. And this disadvantage is characteristic of HDD hard disks, while SSDs are devoid of these disadvantages. They have a special controller that moves the data from bit sectors to working sectors. In this article we will tell you how to check a disk for bit sectors in Linux.
Checking a disk for bit sectors
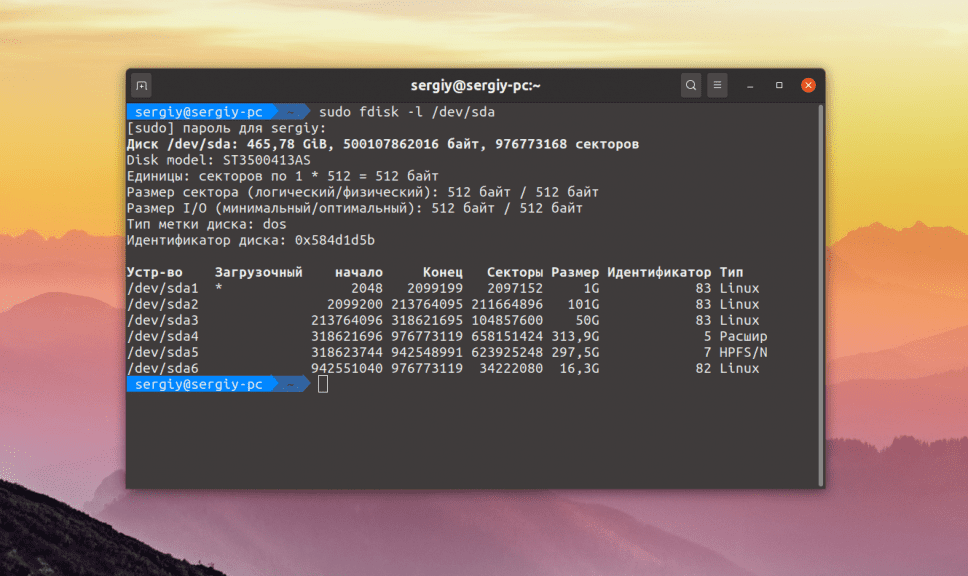
A program called badblocks is suitable for searching for bad sectors on a hard disk in Linux. If you need to check the root or home partition of the disk, it is better to boot into a LiveCD so that the file system is not mounted. If you need to see what partitions are on the disk, you can use the fdisk command:
$ sudo fdisk -l /dev/sda1
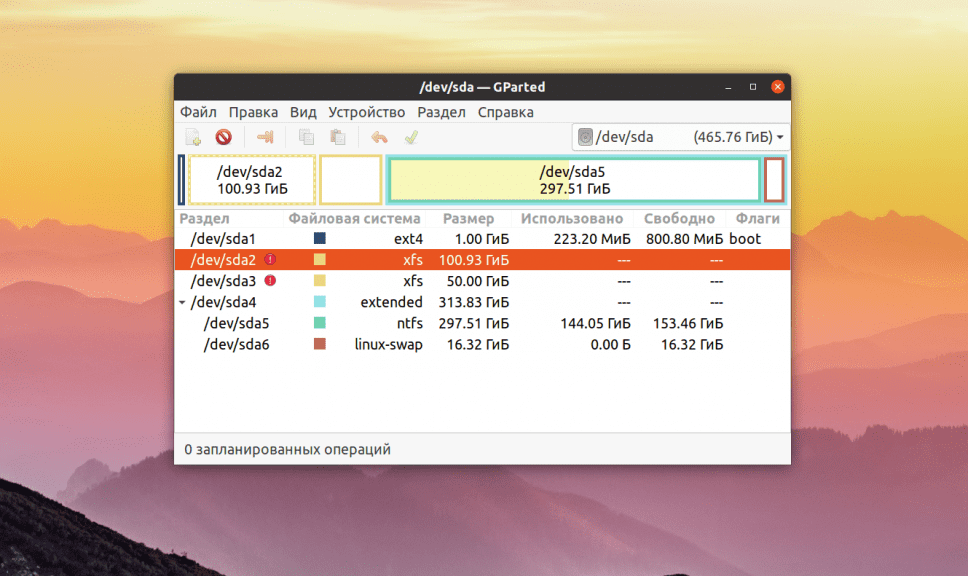
Using the graphical interface, you can use Gparted - a special utility. The user only needs to select the desired disk in the drop-down list.

In a concrete example, let's consider how to check the /dev/sda2 partition with the XFS file system. The badblocks command is used for this purpose. Its syntax is quite simple:
$ sudo badblocks -vn /dev/sda2 -o ~/bad_sectors.txt You may need the following program options:
-e- allows you to set the number of bit blocks, after which the test should not be continued;-f- by default the utility skips the read/write test if the file system is mounted to avoid damaging it, this option allows you to still perform these tests even for mounted systems;-o- write detected bit blocks to the specified file;-p- number of scans, by default only one;-s- shows partition scanning progress;-v- maximum detailed mode;-i- allows you to transfer the list of previously found bit sectors so that you don't have to check them again;-n- use safe read and write test, no data is erased during this test;-w- allows you to perform a write test, a certain sequence of bytes is written to each block, which erases the data that was previously stored there.
For the purpose of a normal test, use this command:
$ sudo badblocks -v /dev/sda2 -o ~/bad_sectors.txtThis command can be executed on the disk with the operating system, nothing will happen - it is not capable of harm. It is allowed to run on a mounted file system, although it is better not to do it If the file system is unmounted, we recommend doing a write test with the -n option:
$ sudo badblocks -vn /dev/sda2 -o ~/bad_sectors.txtAfter the test is complete, the system should be told the information about the bit sectors so that it will not access them. To do this, you can use the fsck utility and the -l option:
$ fsck -l ~/bad_sectors.txt /dev/sda1In case of using Ext family file system, use e2fsck command to search for bit blocks and automatically register them in the file system:
$ sudo e2fsck -cfpv /dev/sda1With the -c option, it is easy to search for bit blocks and add them to the list, -f checks the file system, -p recovers corrupted data, and -v displays everything in detail.
Now you know how to check your hard disk and find bit sectors.


