-
United Kingdom+44 (20) 4577-20-00
-
USA+1 (929) 431-18-18
-
Israel+972 (55) 507-70-81
-
Brazil+55 (61) 3772-18-88
-
Canada+1 (416) 850-13-33
-
Czech Republic+420 (736) 353-668
-
Estonia+372 (53) 683-380
-
Greece+30 (800) 000-02-04
-
Ireland+353 (1) 699-43-88
-
Iceland+354 (53) 952-99
-
Lithuania+370 (700) 660-08
-
Netherlands+31 (970) 1027-77-87
-
Portugal+351 (800) 180-09-04
-
Romania+40 (376) 300-641
-
Sweden+46 (79) 008-11-99
-
Slovakia+421 (2) 333-004-23
-
Switzerland+41 (22) 508-77-76
-
Moldova+373 (699) 33-1-22
 English
How to grant access to Windows Server by IP or IP range
- Main
- Knowledge base
- How to grant access to Windows Server by IP or IP range
To enhance the security of a Windows Server, it's recommended to restrict access to the server. One of the simplest and quickest ways to do this is to allow access only from a specific IP address or range of IPs. This can be achieved by using the built-in firewall system.
Before configuring IP-based access, keep in mind that if your external IP address, from which access is permitted, changes, it will block RDP access to the server. In such a case, it's important to know how to connect to the server directly via VNC (You can always connect to the server using the VNC/IPMI connection window) to resolve the issue.
1. First, we need to connect to the server via RDP.
2. Open the Windows settings:
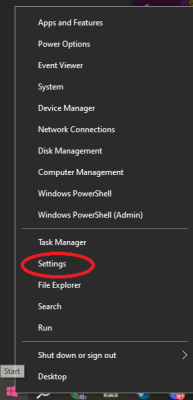
- Right-click on the Windows icon in the bottom left corner of the screen.
- Click on "Settings."
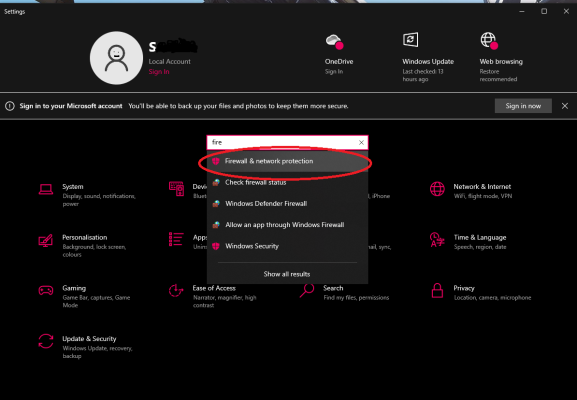
3. To quickly access the Firewall, use the search bar and click on "Firewall & network protection."
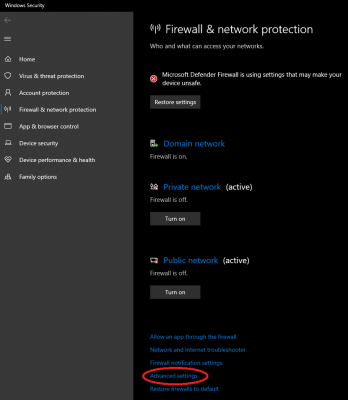
4. Next, click on "Advanced settings."
5. In the opened window:
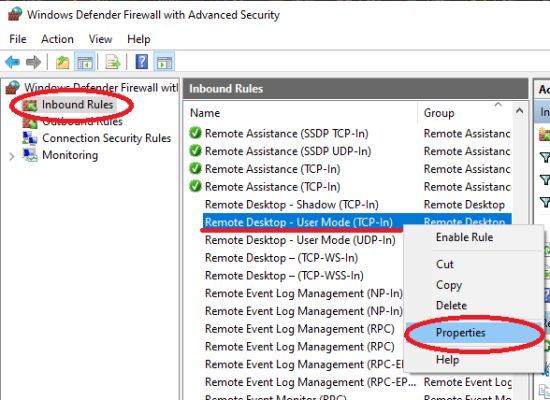
- In the left panel, select "Inbound Rules."
- In the list, find "Remote Desktop - User Mode (TCP-In)."
- Right-click on it and select "Properties."
6. In the opened window:
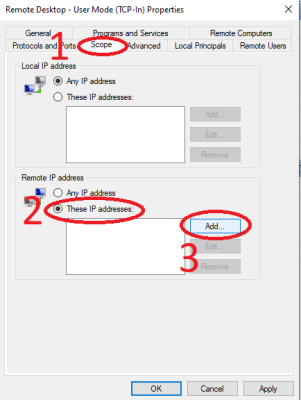
- Click on the "Scope" tab.
- Check the box for "These IP addresses:" under Remote IP address.
- Click "Add."
(On the "Scope" tab, you can specify a particular IP or range of IPs from which RDP access to the server is allowed. To do this, in the "Remote IP address" section, select "These IP addresses" and click "Add.")
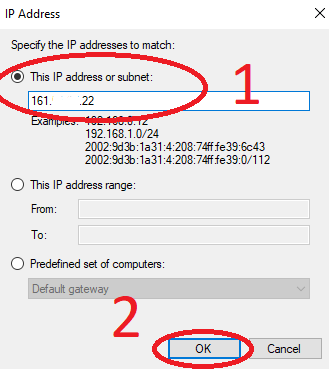
7. To specify a particular IP (or subnet), choose "This IP address or subnet:"
OR:
To specify an IP range, choose "This IP address range:"
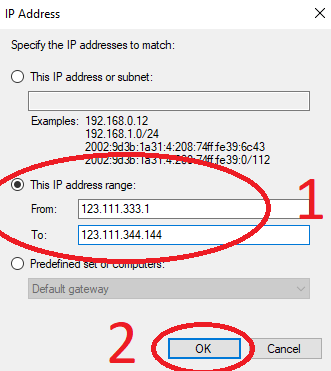
8. Click the "OK" button to apply the settings.
By default, RDP connections to the server use both TCP and UDP protocols. However, there may be a situation where one of the protocols (typically unstable UDP) is disabled. In this case, you need to modify the settings for the rule that uses the specific protocol for the connection. By default, these are two rules: "Remote Desktop - User Mode (TCP Inbound)" and "Remote Desktop - User Mode (UDP Inbound)."
In conclusion, we have learned how to restrict server access on a Windows Server operating system by IP address or range of IPs.


