-
 United Kingdom+44 (20) 4577-20-00
 -
 USA+1 (929) 431-18-18
 -
 Israel+972 (55) 507-70-81
 -
 Brazil+55 (61) 3772-18-88
 -
 Canada+1 (416) 850-13-33
 -
 Czech Republic+420 (736) 353-668
 -
 Estonia+372 (53) 683-380
 -
 Greece+30 (800) 000-02-04
 -
 Ireland+353 (1) 699-43-88
 -
 Iceland+354 (53) 952-99
 -
 Lithuania+370 (700) 660-08
 -
 Netherlands+31 (970) 1027-77-87
 -
 Portugal+351 (800) 180-09-04
 -
 Romania+40 (376) 300-641
 -
 Sweden+46 (79) 008-11-99
 -
 Slovakia+421 (2) 333-004-23
 -
 Switzerland+41 (22) 508-77-76
 -
 Moldova+373 (699) 33-1-22
English
Hosts file: why it is needed, where it is located
- Main
- Knowledge base
- Hosts file: why it is needed, where it is located
hosts is a text file used in operating systems to communicate between domain names and IP addresses. It represents the local distribution of the domain system and allows requests to be redirected to specific IP addresses, bypassing normal DNS servers.
Why you need a hosts file
hosts is often used to set up local test servers, to block access to certain sites or resources, and to solve problems with DNS queries.
When you enter a domain name in a web browser or other application, the operating system first checks the hosts file for a matching entry. If an entry is found, the IP address listed in the hosts file will be used to connect to the server.
Where is it located?
It is usually located in a system directory, such as /etc/hosts in the most common Linux and macOS distributions and C:WindowsSystem32driversetchosts in Windows.
Windows XP, 2003, Vista, 7, 8, 10 — c:windowssystem32driversetchosts

Linux, Ubuntu, Unix, BSD — /etc/hosts

macOS — /private/etc/hosts
The etc hosts file must be edited as administrator, otherwise you will not be able to save your changes.
How to make changes to the hosts file
To make changes to the hosts file, you will need administrator or superuser privileges. Below are instructions on how to make changes to the hosts file on different operating systems:
Windows:
- Open Explorer and navigate to the path
C:WindowsSystem32driversetc. - Find the file named "hosts" and open it with a text editor (e.g. Notepad) with administrator privileges.
- Make the necessary changes by adding lines in the format "IP address domain_name", for example: "127.0.0.1 localhost".
- Save your changes and close the file.
Linux and macOS:
- Open a terminal.
- Run the command
sudo nano /etc/hoststo open the hosts file with root access and the nano editor (you can use any other text editor). - Make the necessary changes by adding lines in the format "IP address domain_name", for example: "127.0.0.1 localhost".
- Press Ctrl + X, then Y, and then Enter to save your changes and close the file.
After making changes to the hosts file, some operating systems may require a reboot or resetting the DNS cache to apply the changes.
Windows 7
Open Explorer and navigate to the following path:
C:WindowsSystem32driversetc.
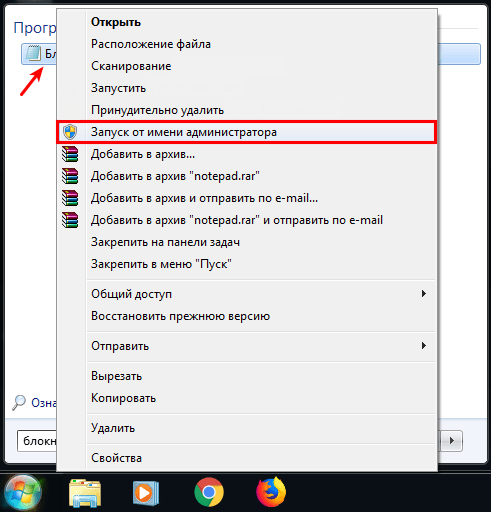
In this folder, find the file named "hosts". To open the file with administrative privileges, right-click on it and select Open with > Notepad.
Make the necessary changes to the file. Each entry should be on a separate line and have the following format:>
IP address domain_name
For example:
127.0.0.1 localhost

Save your changes by clicking on the "File" button in the upper left corner of Notepad, selecting "Save".
You will need administrator privileges to edit the hosts file in Windows 7, so make sure you are performing this operation as a user with the appropriate privileges.
Windows 8, 10
Open Explorer and navigate to:
C:WindowsSystem32driversetc.
In this folder, find the file named "hosts". Right-click on it and select Open with > Notepad.
If Notepad is not listed, click on "More Applications" and select "Notepad".
If you can't save your changes due to access restrictions, copy the "hosts" file to your desktop. Edit it on your desktop using notepad.
Make the necessary changes to the file. Each entry should be on a separate line and should have the following format:
IP address domain_name
For example:
127.0.0.1 localhost
Save the changes. If you edited the file on the desktop, drag it back to the C:WindowsSystem32driversetc directory and agree to replace the existing file.
Linux, Unix
To edit the hosts file in Linux or Unix, you can use any text editor such as vi, nano or gedit.
Open a terminal.
Type the command to open the hosts file using the text editor you want. For example:
For vi: sudo vi /etc/hosts
For nano: sudo nano /etc/hosts
For gedit: sudo gedit /etc/hosts
Enter the superuser (root) password to gain access to edit the file.
Add or modify entries in the hosts file. Each entry must contain an IP address and its corresponding domain name, separated by a space or tab.
For example:
127.0.0.1 localhost
192.168.0.1 example.com
Save your changes and close the editor. In the case of vi, you will need to press `Esc`, then type `:wq` and press Enter. In nano, you will need to press Ctrl + X, then Y to save the changes. Check the hosts file to see that the changes you have made have taken effect. You can use the cat /etc/hosts command to view the contents of the file.
Editing the hosts file will require superuser privileges. So using the `sudo` command before opening the file will help you get the right privileges.
macOS
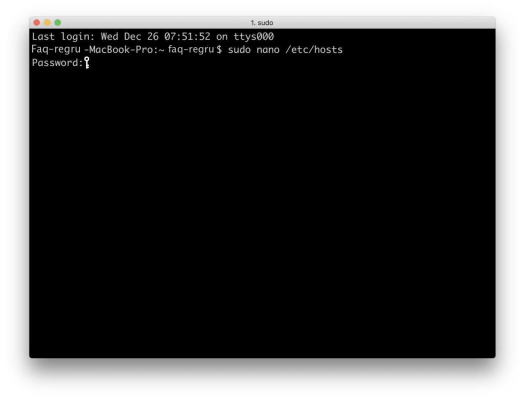
Open Finder and navigate to the "Applications" folder.
In the "Applications" folder, locate and launch the "Terminal" program.
In the terminal window, enter the following command: sudo nano /etc/hosts
Enter your macOS account password and press the "Enter" key.
In the nano editor that opens, you'll see the contents of the hosts file.
Add or modify entries in the hosts file. Each entry should contain an IP address and its corresponding domain name, separated by a space or tab.
For example:
127.0.0.1 localhost
192.168.0.1 example.com
Press "Ctrl + O" followed by "Enter" to save your changes.
Then press "Ctrl + X" to close the nano editor.
Editing the hosts file will require superuser privileges. Therefore, using the sudo command before opening the file will help you get the right privileges.
Blocking access to a website through the hosts file
To block access to a particular website through the hosts file, you need to modify the file by redirecting the requested web address to a local IP address or an incorrect IP address.
Here's how it can be done:
- Open a terminal or command prompt on your operating system.
- Enter the command
sudo nano /etc/hoststo open the hosts file with superuser privileges. - Enter the superuser password, if required.
- Scroll through the file to the end or to the desired location.
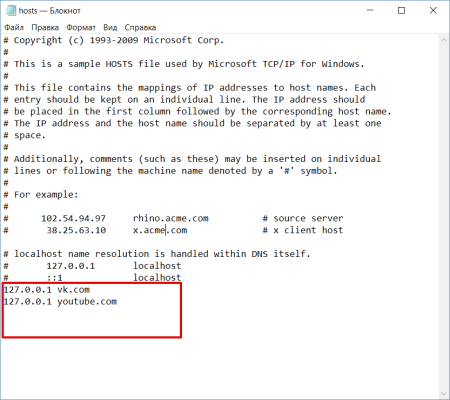
- Add a new line to the file, starting with the IP address followed by the domain name you want to block. You can use 127.0.0.1 (local IP address) as the IP address, or you can specify an invalid IP address. For example: 127.0.0.0.1 example.com or 0.0.0.0.0 example.com
- Save your changes and close the editor (for example, in nano, press Ctrl + O, then Enter, and Ctrl + X to save and exit).
- Reboot your browser or clear its cache to update your settings with the new hosts file.
After performing these steps, your computer will redirect requests to the specified site to a local IP address or an incorrect IP address, which will result in an inability to access that site.
Original hosts file and how to restore it
The original hosts file in a Linux, Unix or macOS operating system contains a minimal set of entries, usually only for accessing local resources, without blocking access to any websites.
The contents of the original hosts file for Windows:
# Copyright (c) 1993-2006 Microsoft Corp.

#

# This is a sample HOSTS file used by Microsoft TCP/IP for Windows.
#
# This file contains the mappings of IP addresses to host names. Each
# entry should be kept on an individual line. The IP address should
# be placed in the first column followed by the corresponding host name.
# The IP address and the host name should be separated by at least one
# space.
#
# Additionally, comments (such as these) may be inserted on individual
# lines or following the machine name denoted by a '#' symbol.
#
# For example:
#
#      102.54.94.97     rhino.acme.com          # source server
#       38.25.63.10     x.acme.com              # x client host
# localhost name resolution is handle within DNS itself.
#       127.0.0.1       localhost
#       ::1             localhost
For Linux:
127.0.0.1       localhost

127.0.1.1      user

# The following lines are desirable for IPv6 capable hosts
::1     ip6-localhost ip6-loopback
fe00::0 ip6-localnet
ff00::0 ip6-mcastprefix
ff02::1 ip6-allnodes
ff02::2 ip6-allrouters
Mac:
##

# Host Database

#

# localhost is used to configure the loopback interface
# when the system is booting.  Do not change this entry.
##
127.0.0.1  localhost
255.255.255.255  broadcasthost
::1             localhost
Note that restoring the original hosts file will remove any settings you added (including blocking access to websites).
Other articles of the section


