-
United Kingdom+44 (20) 4577-20-00
-
USA+1 (929) 431-18-18
-
Israel+972 (55) 507-70-81
-
Brazil+55 (61) 3772-18-88
-
Canada+1 (416) 850-13-33
-
Czech Republic+420 (736) 353-668
-
Estonia+372 (53) 683-380
-
Greece+30 (800) 000-02-04
-
Ireland+353 (1) 699-43-88
-
Iceland+354 (53) 952-99
-
Lithuania+370 (700) 660-08
-
Netherlands+31 (970) 1027-77-87
-
Portugal+351 (800) 180-09-04
-
Romania+40 (376) 300-641
-
Sweden+46 (79) 008-11-99
-
Slovakia+421 (2) 333-004-23
-
Switzerland+41 (22) 508-77-76
-
Moldova+373 (699) 33-1-22
 English
Configuring OpenVPN Server in WebMin on Ubuntu 22.04
- Main
- Knowledge base
- Configuring OpenVPN Server in WebMin on Ubuntu 22.04
Once the virtual server has been purchased and configured, the next step is to create the OpenVPN server itself, or rather its configuration. If you don't know how to install Webmin and add server keys, we recommend you to read our previous articles.
Configuring OpenVPN Server
Go to "VPN List" to add the OpenVPN server config.

Select our certificate authority and click "New VPN Server":

There are a lot of settings here and if you have had previous experience with OpenVPN, you already know what and where to enter, so I will only show you the basic settings. We need to name our server, select the port, which is 1194 by default, select our server certificate, set the pool of IP addresses that will be given to the clients of the server and select encryption. I also recommend to enable management to see connected clients. You can enter any port, for example, 7505.

Save and go to the step of adding clients.

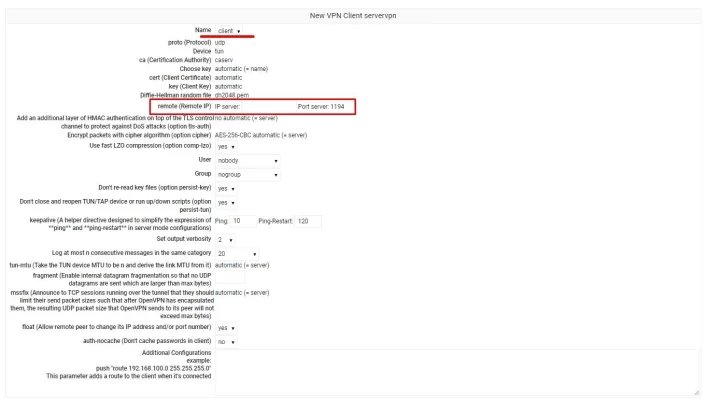
Click on the "New VPN Client" button and add a client. Here you must select the client certificate and enter the external IP address of the server for connection.

The server is ready to start. Now just go to the VPN List and select Start on the right in the Action column of our OpenVPN Server.


