-
 United Kingdom+44 (20) 4577-20-00
 -
 USA+1 (929) 431-18-18
 -
 Israel+972 (55) 507-70-81
 -
 Brazil+55 (61) 3772-18-88
 -
 Canada+1 (416) 850-13-33
 -
 Czech Republic+420 (736) 353-668
 -
 Estonia+372 (53) 683-380
 -
 Greece+30 (800) 000-02-04
 -
 Ireland+353 (1) 699-43-88
 -
 Iceland+354 (53) 952-99
 -
 Lithuania+370 (700) 660-08
 -
 Netherlands+31 (970) 1027-77-87
 -
 Portugal+351 (800) 180-09-04
 -
 Romania+40 (376) 300-641
 -
 Sweden+46 (79) 008-11-99
 -
 Slovakia+421 (2) 333-004-23
 -
 Switzerland+41 (22) 508-77-76
 -
 Moldova+373 (699) 33-1-22
English
Installing an SSL certificate
- Main
- Knowledge base
- Installing an SSL certificate
SSL certificate on VPS/VDS is used to ensure the security of data transfer between the client and the server. An SSL certificate is used to protect the transmitted data by encrypting it, thus preventing attackers from accessing this data.
An SSL certificate on a VPS/VDS also helps in improving user trust in your website as it ensures that your website is secure and trusted. In addition, an SSL certificate improves your site's SEO optimization, as Google and other search engines favor HTTPS-protected sites.
What you need to install an SSL certificate
- A certificate file and certificate chain;
- Certificate key. The key is generated before ordering a certificate, a CSR request is generated based on the key;
- Root access to the server.
Where does the data for certificate installation come from?
The archive with data for SSL certificate installation will be sent immediately after certificate issuance to the contact e-mail specified by you during registration on the PQ.Hosting website.
You can also download the archive in your PQ.Hosting personal cabinet in the SSL Certificates section

Where can I get the private key of the certificate?
If you did not enable the "Do not save the key in the system" option when ordering an SSL certificate, the key can be found in your personal cabinet in the SSL Certificates section. If for some reason you did not save the key, reissue the certificate using a new CSR request.
Installing an SSL certificate on a VPS/VDS or dedicated server
- Enable SSL for the user who owns the domain: Users - select user - Access.
- Authorize under this user's account.
- Go to SSL Certificates - Add Certificate button.

- Specify the Certificate Type "Existing" and fill in all fields:
SSL Certificate Name - the name of the certificate under which it will be displayed in the system. It can contain Latin alphabet letters, numbers, dots, as well as _ and - signs.
SSL Certificate - the contents of the SSL Certificate in
PEM format.SSL Certificate Key - the contents of the SSL Certificate key in PEM format.
SSL Certificate bundle - the contents of the SSL Certificate bundle file in PEM format. A letter from a certificate authority usually contains an archive with two files - the certificate itself and the certificate chain (a file with the
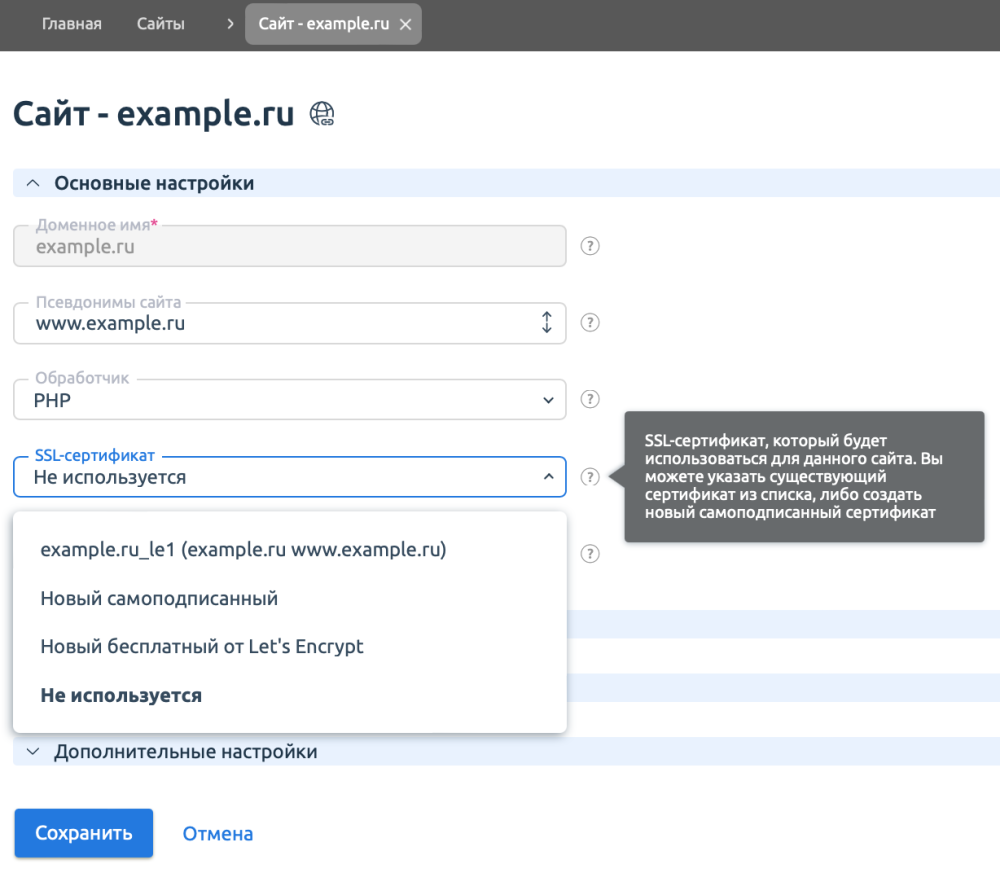
.ca-bundleextension). - After adding the certificate, you can enable it for the site: Sites - select the site - Edit - in the drop-down menu click Edit - in the SSL Certificates field select the required SSL certificate.
- You can check certificates by clicking on the link:
https://www.ssllabs.com/ssltest/analyze.html;
https://www.sslshopper.com/ssl-checker.html.
Please note that the GlobalSign Certification Authority sends the chain of custody file in PKCS7 format (extension .p7b). You can open this file in a text editor or convert it to PEM format. Example command for conversion: openssl pkcs7 -print_certs -in certificate.p7b -out certificate.cer
Manual installation method
To find out which web server handles SSL requests - Apache or Nginx, run the command:
netstat -napt | grep 443Install on Apache
1. The certificate is installed in the Apache configuration file:
For Debian OS - /etc/apache2/apache2.conf;
for OS CentOS - /etc/httpd/conf/httpd.conf.
2. Add the certificate details to the VirtualHost section of your domain:
Configuration Example
<VirtualHost 10.0.0.1:443>
	DocumentRoot /var/www/user/data/www/domain.com
	ServerName domain.com SSLEngine on
	SSLCertificateFile /path/to/domain.crt
	SSLCertificateKeyFile /path/to/domain.key
	SSLCACertificateFile /path/to/ca.crt
</VirtualHost>
3. Restart Apache:
Command for OS CentOS
apachectl restartCommand for Debian OS
apache2ctl restartInstall SSL certificate on Nginx
The certificate is installed in the Nginx configuration file.
1. Combine the SSL certificate, intermediate and root certificates into one file your_domain.crt. You can find the certificate data in the e-mail message sent to your contact e-mail after the certificate is issued. You can also download them together with the main certificate in your personal cabinet on the PQ.Hosting website.
File example
-----BEGIN CERTIFICATE-----
#Your Certificate#
-----END CERTIFICATE-----
-----BEGIN CERTIFICATE-----
#Intermediate Certificate#
-----END CERTIFICATE-----
-----BEGIN CERTIFICATE-----
#Root Certificate#
-----END CERTIFICATE-----
2. Create the file your_domain.key and copy the content of the certificate's private key into it.
nano your_domain.key3. Copy your_domain.crt and your_domain.key files to the same directory. For example, /etc/ssl/.
sudo cp your_domain.crt your_domain.key /etc/ssl/
4. Configure the server block in the Nginx configuration file as follows:
server {
       listen 443;
       ssl on;
       ssl_certificate /etc/ssl/your_domain.crt;
       ssl_certificate_key /etc/ssl/your_domain.key;
       server_name your.domain.com;
       }
5. Reboot the Nginx server:
/etc/init.d/nginx restartIf you have difficulty installing an SSL certificate on your hosting account, contact support for further assistance.
Other articles of the section


